Behind the Craft — How Custom Resin Doors Are Made (Step-by-Step Process)
Ever wondered how artisans create those breathtaking custom resin doors with mesmerizing colors and flowing river patterns? The process behind creating these stunning entryway pieces is equal parts precise engineering and creative artistry. Understanding the craftsmanship involved helps you appreciate why quality resin doors command premium pricing and why they represent such exceptional value for discerning homeowners. Here's a comprehensive behind-the-scenes look at how custom resin doors come to life in professional workshops across Missouri and beyond.
Step 1: Initial Consultation and Design Concept
The journey of creating a custom epoxy door begins long before any materials are selected or resin is poured. Professional resin artisans start with detailed consultations to understand the client's vision, architectural context, and practical requirements. This critical planning phase ensures the final product perfectly matches expectations and performs optimally in its intended location.
During consultations, craftsmen discuss aesthetic preferences including color palettes, pattern styles, opacity levels, and overall design themes. They evaluate practical considerations like door dimensions, weight requirements, hardware compatibility, and installation constraints. Technical specifications including climate considerations, exposure to elements, security requirements, and energy efficiency goals are carefully reviewed. Budget parameters and timeline expectations are established to ensure realistic planning.
Experienced resin door artisans often create digital mockups or hand-drawn sketches showing how proposed designs will appear once completed. This visualization helps clients make informed decisions about colors, patterns, and embedded elements before any irreversible steps are taken. Many craftsmen maintain portfolios of previous projects to help clients understand possibilities and inspire creative directions.
Step 2: Selecting Premium Wood Materials
Once the design concept is finalized, craftsmen begin by carefully selecting high-quality hardwoods that will form the structural foundation and visual complement to the resin elements. The choice of wood significantly impacts both the door's aesthetic character and its structural performance. Resin door craftsmen in Nixa and throughout the Ozarks region have access to excellent hardwood sources including local mills and specialty lumber yards.
Popular hardwood choices include black walnut which offers rich, dark chocolate tones with beautiful grain patterns making it perfect for river-style designs. Hard maple provides light, creamy tones that create stunning contrast with colorful resins. Red oak delivers classic grain patterns and reliable structural properties at moderate cost. Eastern cedar offers natural rot resistance and aromatic properties ideal for exterior applications. Reclaimed barn wood provides character, history, and sustainability appeal.
For river-style designs, live-edge slabs with natural curves and bark edges are especially popular. These slabs preserve the tree's natural form, creating organic, one-of-a-kind patterns when combined with flowing resin. Craftsmen carefully inspect wood for moisture content, which must be properly dried to around 6-8 percent to prevent future warping or cracking. They also evaluate grain patterns, natural features like knots or burls, color consistency, and structural soundness.
Many custom resin door projects incorporate salvaged or reclaimed wood, giving new life to materials that would otherwise be discarded. This sustainable approach appeals to environmentally conscious clients while often providing unique character that new lumber cannot match.
Step 3: Wood Preparation and Mold Construction
Selected wood pieces undergo meticulous preparation before resin application. This crucial phase ensures optimal adhesion, proper resin flow, and flawless final appearance. Craftsmen cut wood to precise dimensions specified in the design, allowing for resin cavities or channels. They plane and sand surfaces to exact specifications ensuring level resin pools. Edges are carefully shaped and any natural defects that could leak resin are sealed.
For river-style designs, craftsmen create channels or gaps where resin will flow. These negative spaces are carefully shaped to achieve desired aesthetic effects—gentle curves for organic feel, dramatic angles for modern designs, or irregular natural edges for rustic character. The wood is then mounted in custom forms or molds that contain the resin during pouring and curing. These molds must be perfectly level and completely sealed to prevent leaks.
Professional artisans often apply mold release agents to forms, ensuring the finished door can be extracted without damage. They may also attach dam walls or barriers that define resin boundaries and create clean edges. This preparation phase requires precision and patience—any shortcuts here can compromise the entire project.
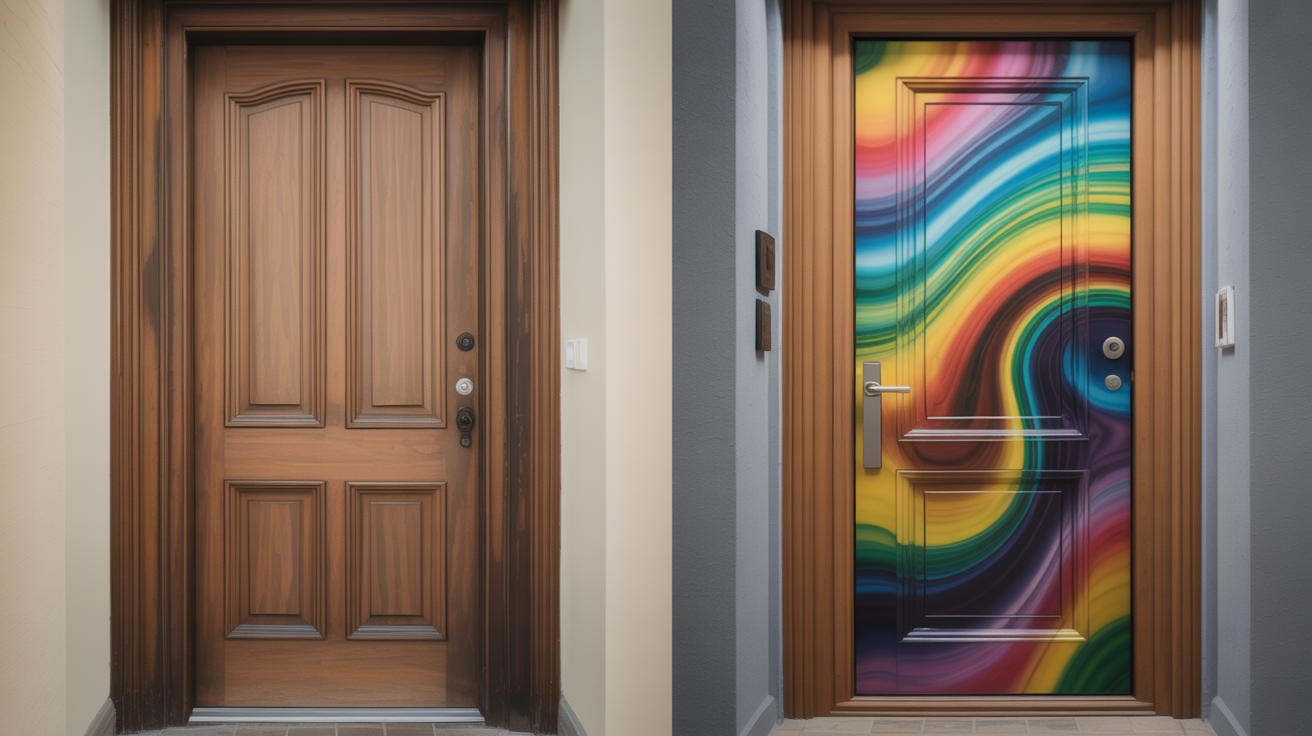
Step 4: Designing the Custom Resin Pattern
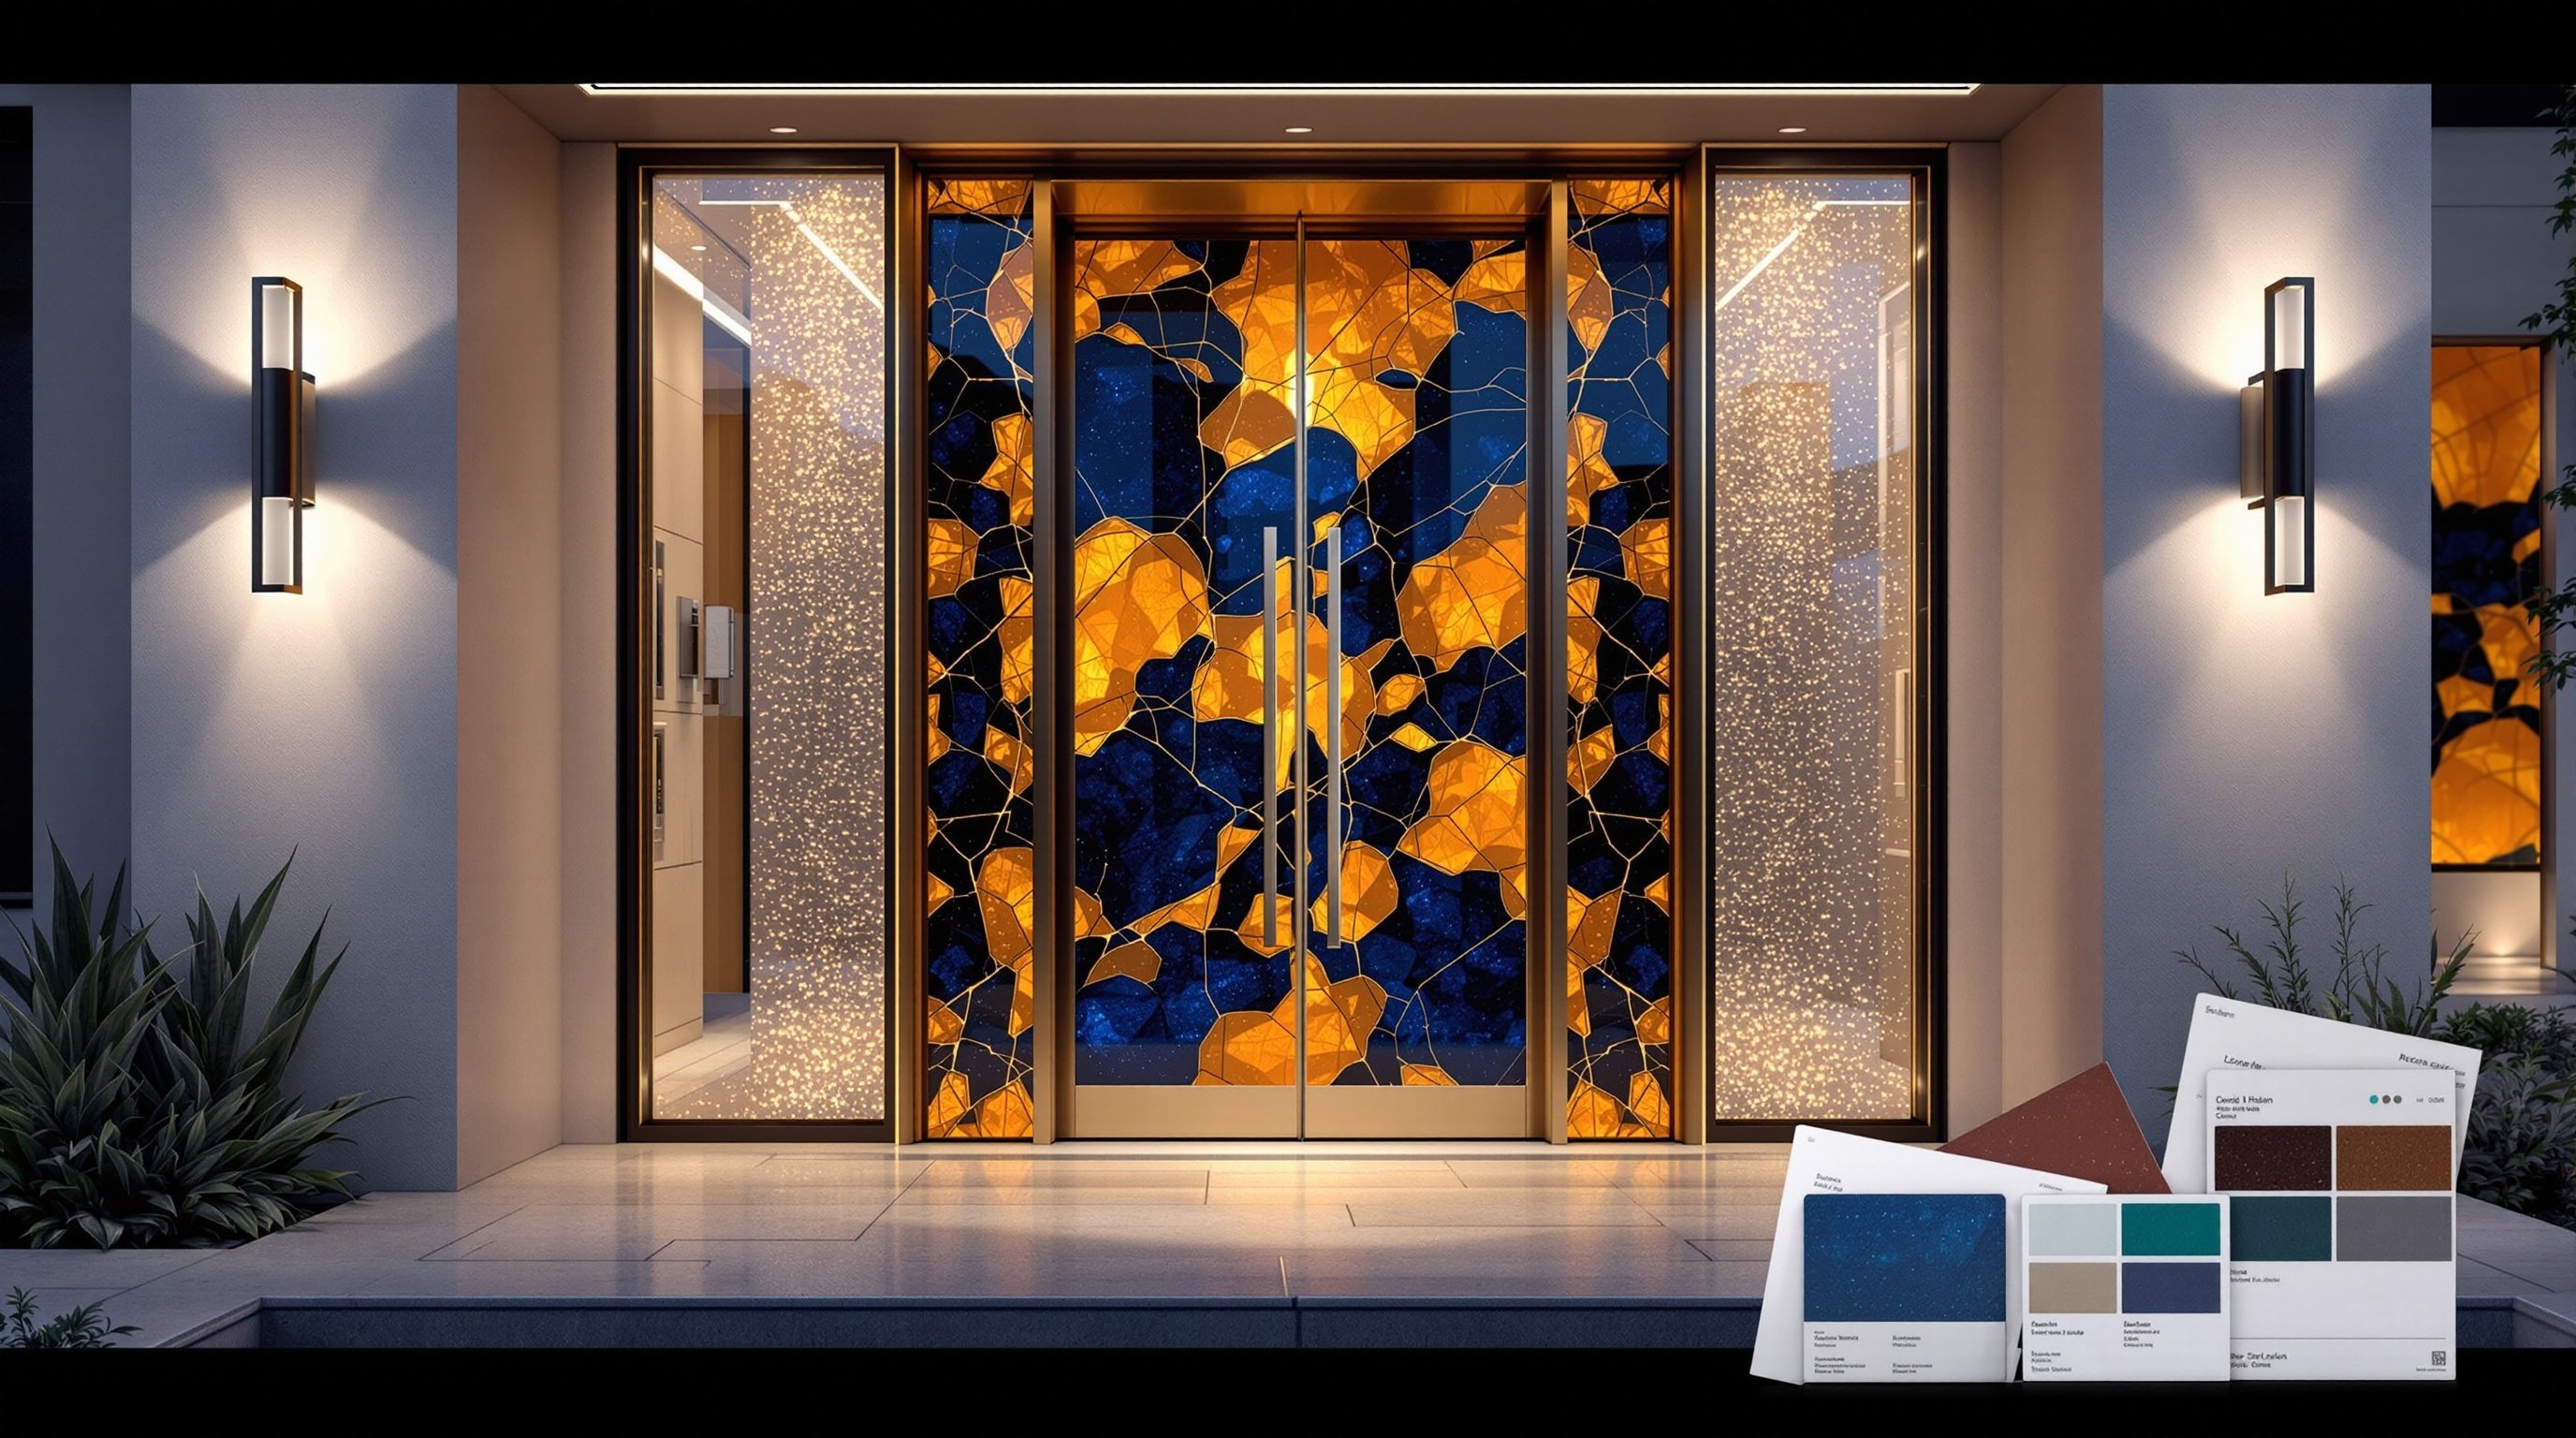
This is where technical skill meets creative vision. The resin design phase transforms concepts into actionable plans that guide the pouring process. Customers work with artisans to finalize exact color selections from an essentially unlimited palette. Metallic pigments are chosen including gold, copper, silver, bronze, or pearl effects. Translucency levels are determined from crystal clear to semi-opaque to fully opaque. Pattern styles are defined—river flow, marble swirl, geode effect, or custom artistic designs. Embedded elements like stones, shells, mica, crystals, or other materials are selected.
Every handcrafted resin door begins as a personalized design that reflects the client's unique vision. Unlike mass-produced doors, there are virtually no constraints on creativity. Want a door that captures the colors of a Caribbean sunset? Done. Prefer something mimicking the depths of Lake of the Ozarks? Absolutely possible. The only limits are imagination and physics.
Experienced craftsmen understand how different pigments behave during pouring and curing. Some create dramatic separation effects, others blend smoothly. Metallic additives sink, float, or suspend depending on timing and technique. This expertise separates amateur projects from professional masterpieces.
Step 5: Precise Resin Mixing and Preparation
The epoxy resin mixture requires precise formulation to achieve desired properties. Modern epoxy door craftsmen use professional-grade resins specifically designed for large-scale projects like doors. These products offer superior clarity, UV resistance, and structural integrity compared to hobby-grade alternatives.
The resin mixture includes a resin base (typically clear epoxy), a hardener that triggers the curing reaction, custom pigments for color, metallic additives for shimmer effects, and specialized additives for controlling viscosity, curing speed, or UV resistance. Precision is absolutely critical—mixing ratios must be exact to ensure proper curing. Too much hardener causes exothermic reactions that can crack or yellow the resin. Too little prevents complete curing, leaving tacky surfaces.
Professional artisans carefully measure components using digital scales accurate to the gram. They mix thoroughly but gently to minimize air bubbles. Many use vacuum degassing chambers to remove microscopic bubbles that would mar clarity. Temperature control during mixing is also crucial—epoxy behaves differently at varying temperatures affecting viscosity, working time, and final appearance.
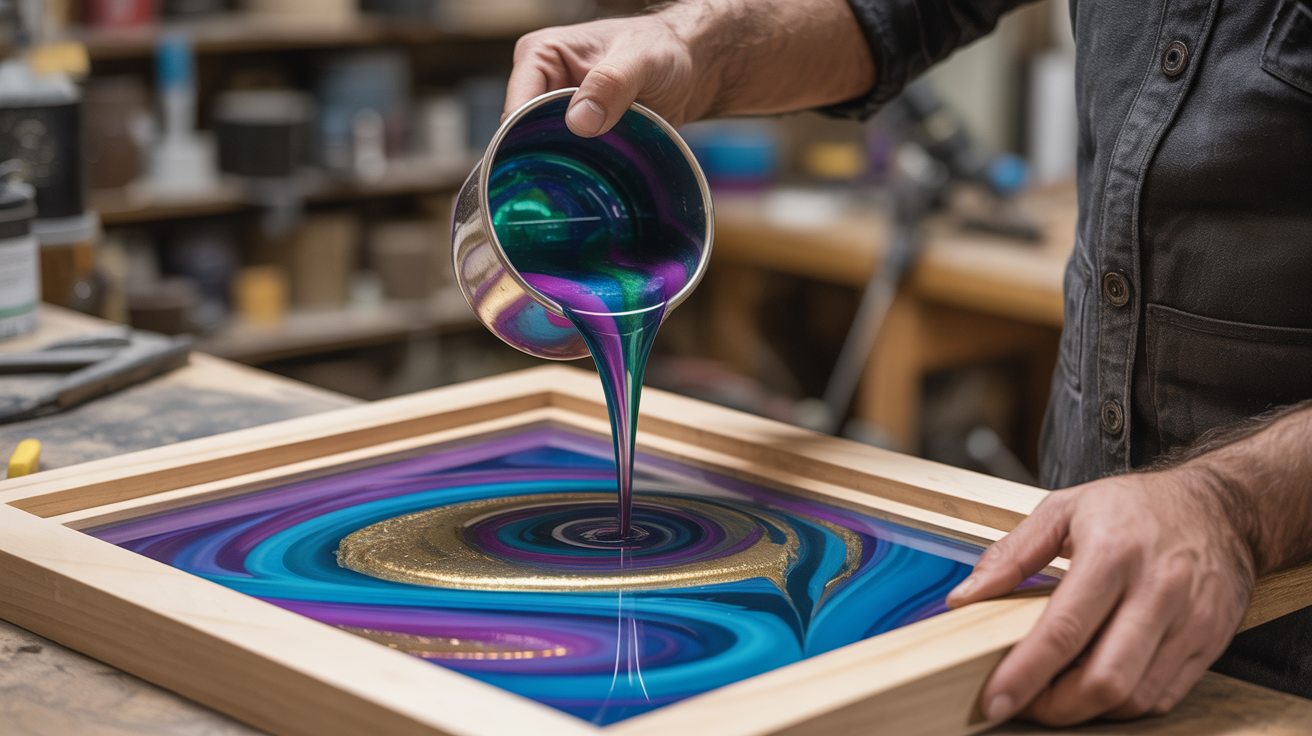
Step 6: The Pour—Where Magic Happens
The resin pour represents the most dramatic and critical phase of custom resin door creation. This is where liquid transforms into art, and careful planning becomes visible reality. The pouring technique varies based on desired effects. Single pours create bold, uniform colors perfect for solid sections. Layered pours build depth and movement with multiple colors stacked vertically. Swirl techniques create marble effects by manipulating wet resin. Dirty pours combine multiple colors in one cup creating spontaneous patterns.
Craftsmen pour slowly and deliberately, controlling flow to achieve precise effects. For river designs, resin flows through channels carved in wood, seeking level and filling voids. The artisan may guide the flow with sticks or heat guns, creating swirls and patterns. Multiple thin layers are often better than one thick pour, reducing heat buildup and allowing precise control.
Throughout pouring, craftsmen watch for potential issues including air bubbles rising from wood grain, uneven flow creating thin spots, unexpected color separation, or foreign particles in the resin. They address problems immediately—removing bubbles with heat guns, adjusting pour locations, adding more resin to thin areas, and maintaining strict cleanliness to prevent contamination.
This stage requires years of experience to master. Every wood species, every resin brand, every pigment combination behaves slightly differently. Professional resin artisans in Nixa and throughout Missouri have poured hundreds or thousands of projects, developing intuitive understanding that cannot be taught from books alone.
Step 7: Controlled Curing Process
After pouring, the resin must cure for 24 to 72 hours depending on thickness, ambient temperature, and specific resin formulation. During this time, chemical reactions transform liquid epoxy into solid, durable material. The curing process is temperature and humidity sensitive—craftsmen carefully monitor environmental conditions. They maintain consistent temperatures typically between 70-80 degrees Fahrenheit, control humidity to prevent moisture contamination, protect from dust and debris that could embed in curing resin, and shield from direct sunlight that could cause uneven curing.
Many professional shops use climate-controlled curing rooms maintaining optimal conditions. This eliminates variables that could compromise results. During curing, artisans resist the temptation to disturb the piece. Moving or tilting can disrupt the leveling process creating uneven surfaces. Patience truly equals perfection in custom epoxy door fabrication.
As resin cures, it generates heat through exothermic chemical reactions. Craftsmen must ensure this heat dissipates safely without cracking the resin. Thick pours require special attention—excessive heat buildup can cause catastrophic failures. This is why professional artisans often use multiple thin layers rather than single thick pours.
Step 8: Meticulous Sanding and Surface Preparation
Once fully cured, the door undergoes extensive sanding to achieve perfect flatness and smoothness. This labor-intensive process typically involves 8 to 12 progressively finer grit levels. Craftsmen begin with coarse grits (80-120) to level surfaces and remove high spots, progress to medium grits (150-220) to eliminate coarse scratches, continue with fine grits (320-400) to develop initial smoothness, and finish with ultra-fine grits (600-2000) to create glass-like surfaces.
Professional craftsmen use power sanders for efficiency on flat areas but hand-sand edges and details requiring delicate touch. They frequently check flatness using straightedges and examine surfaces under bright lighting to identify imperfections. Water sanding at finer grits reduces dust and achieves superior smoothness. This attention to surface preparation separates amateur work from professional handcrafted resin doors.
Step 9: Final Finishing and Protection
After sanding, doors receive final finishing treatments. Many artisans apply polyurethane or specialized epoxy top coats providing UV protection, enhanced scratch resistance, and deeper visual depth. The finish can be high-gloss for maximum shine and depth, satin for subtle sophistication, or matte for contemporary aesthetics. Multiple thin coats build optimal protection and appearance.
Between finish coats, craftsmen perform light sanding to ensure perfect adhesion and eliminate dust particles. The final coat is applied in dust-free environments and allowed to cure completely before handling. This finishing process adds 3-7 days to the project timeline but dramatically improves long-term durability and appearance.
Step 10: Hardware Installation and Final Assembly
With the door body complete, craftsmen install hinges, locksets, handles, weather-stripping, and any decorative hardware. They carefully position hardware for optimal function and aesthetic balance. Mounting holes are precisely drilled and reinforced as needed for heavy-duty hardware. For backlit designs, LED strips and wiring are carefully integrated and tested.
Step 11: Quality Inspection and Client Approval
Before installation, every custom resin door undergoes rigorous quality inspection. Craftsmen check for surface imperfections, hardware operation, dimensional accuracy, color accuracy versus approved samples, and overall aesthetic impact. Many artisans photograph finished doors for portfolio purposes and client records. Clients typically review and approve the completed door before installation proceeds.
Step 12: Professional Installation
The finished resin door becomes a functional, durable piece of art ready for installation. Professional installation ensures the door fits perfectly, operates smoothly, seals effectively against weather, and showcases the craftsmanship appropriately. Experienced installers level the door precisely, adjust hinges for perfect operation, install proper weather-stripping, and test all hardware functions.
The installation completes the transformation from concept to reality—a unique artistic statement that will grace the home's entrance for decades to come.
Understanding the Craftsmanship Investment
Whether you're fascinated by the craftsmanship process or planning to order your own custom resin door, understanding the meticulous steps involved helps you appreciate the artistry behind every swirl, shimmer, and color transition. Each phase requires specialized skills, proper equipment, quality materials, and significant time investment. This explains why custom resin doors represent a significant investment—you're not merely purchasing a door, but commissioning a functional art piece created specifically for your home.
For homeowners in Nixa, Springfield, and throughout the Ozarks region, working with experienced local artisans ensures access to this level of craftsmanship and attention to detail. These skilled craftspeople combine technical expertise with artistic vision, creating doors that serve as beautiful, durable statements of personal style and quality appreciation.
Tags
Ready to Create Your Custom Resin Door?
Let's bring your vision to life with a one-of-a-kind custom resin door